Tampilkan postingan dengan label Tutorial flashing. Tampilkan semua postingan

Fashing CPU Infineon With MCNPro Box

Diposting oleh fatih on Kamis, 08 Maret 2012

Tutorial Fashing CPU Infineon With MCN Pro Box

Follow step by step flashing phone china cpu infineon by MCN Pro Box:

1. Open Mcnpro Box main software .Start to scan phone , Apply info.(this time you need holding phone Power on Key)


2. Now you can see Software automatic convert to INFINEON interface

3. Next Press Read to make backup


4. Next Press Flash to make flashing the phone


5. Step for unlock . Select the flashfile and press unlock button, then press power on of your phone you can get the phone unlock code , manual input to phone, Phone unlocked.


MCN Pro Box is the best tool for chineese phone
Read More

Error due to *.cardverref.xml – When Using Firmware Update in Phoenix Service Software

Diposting oleh fatih on Rabu, 30 November 2011

It may be possible that Phoenix service software shows error due to *.cardverref.xml – file verification failure when using Firmware Update
The purpose of this article is to provide a workaround for this problem
Phoenix may show an error due to *.cardverref.xml – file verification failure during Firmware Update. This may happen when product software files have been downloaded from Nokia Firmware Repository with Phoenix “Data Package Download” – function or Nokia Data Package Manager tool
This particular file is not necessary for Care, it is used only in production but still gets uploaded to FiRe with other variant specific files.
Care Suite Product Support Tool does not check the version of the file ( it is not used in programming anyway) so error is not shown.
The reason for error is that that different versions of the same file may get downloaded to same product specific folder, when software for different product codes is downloaded from Nokia Firmware Repository.
WORKAROUND:
Go to product specific folder and delete the *.cardverref.xml -  file.  Then flashing works again. Please see attached document for screenshots.
EXAMPLE CASE AND SOLUTION FOR RM-596:
  • Use DPM to Download files for RM-596 code 059C7R0
  • RM-596_M020.44.emmc.cardverref.xml – file for  059C7R0 is 366 bytes in size
  • Use DPM to Download files for RM-596 code 0599250
  • RM-596_M020.44.emmc.cardverref.xml file for 0599250 is 375 bytes in size
  • Now there are two versions of the same file in the same product specific data location
  • Refurbishment flash with Phoenix
    • 0599250 -> OK
    • 059C7R0 -> FAIL ( files for this variant were downloaded first, RM-596_M020.44.emmc.cardverref.xml was Overwritten by dfferent version of the same file)
  • The name of the file causing problem is shown in the error message
  • Solution:
    • Delete RM-596_M020.44.emmc.cardverref.xml from product specific folder
  • After this Refurbishment flash with Phoenix
    • 059C7R0 -> OK
    • 0599250 -> OK
Issue did not exist when offline data packages were used, they were put together with one file which did not change. But when files are coming down from FiRe it is possible to get different versions of this file.
Original Post : seidea.com
Read More

Tutorial Upgrade OS BlackBerry

Diposting oleh fatih on Kamis, 17 November 2011

Sebenarnya upgrade OS buat BlackBerry sangat mudah dan sudah banyak yang share baik itu di forum-forum teknisi handphone maupun blog nya para teknisi namun tidak ada salahnya saya juga ikut berbagi, semoga Tutorial upgrade OS Blackberry ini bisa bermanfaat.

Peralatannya yang diperlukan:
1. USB Cable, usahakan kabel usb yang original/bawaan BB Anda
2. Blackberry Desktop Manager, Download disini
3. Microsoft NetFrame Work, Download Disini
4. OS BlackBerry sesuai type handset Anda

Sebetelah semua tool dari poin 2 sampai poin 4 telah terinstall di komputer Anda pastikan file vendor.xml sudah terhapus

C:\program files\common files\research in motion\ 
apploader\vendor.xml

Catatan: jangan lupa untuk membuat shortcut leader.exe di desktop Anda untuk mempermudah membuka applikasi loader

Step by step pengerjaan:

1. Hubungkan BB dengan komputer via USb dan klik Loader.exe

Upgrade OS BlackBerry

2. Kemudian klik Next dan tunggu hingga Loader membaca perangkat Anda

Upgrade OS BlackBerry


3. Selanjutnya silahkan pilih system dan applikasi yang ingin Anda install dan kilk Next


Upgrade OS BlackBerry


4. Proses Upgrade sedang berlangsung, proses nya adalah mulai Read -> Erase -> Load -> Reconnect JVM dan Load JVM

Upgrade OS BlackBerry


5. Setelah ini proses upgrade selesai biasanya BlackBerry Anda akan booting selama 10-20 menit, dan selama proses booting berlangsung jangn pernah mencabut USB yang tersambung dengan komputer.
Read More

Tutorial Flashing SGS I9000 Darky V10.1 JVH Gingerbread

Diposting oleh fatih on Minggu, 30 Oktober 2011


Tutorial Flashing SGS I9000 Darky V10.1 JVH Gingerbread

Tutorial ini ditulis dengan menerjemahkan bebas dari situs Darky dengan beberapa penambahan tentunya, Untuk tutorial aslinya bisa dilihat di web Darky. Semoga dengan tutorial ini dapat membantu anda dalam melakukan flashing Samsung Galaxy SGS i9000.


Catatan penting sebelum Flasing.

1. ROM Darky V10.1 ini adalah Firmware Gingerbread versi JVH.
2. Cek dulu Firmware SGS sebelum flashing Darky V10.1. Jika dari Froyo maka harus Flash ke JVH ROM yang ada bootloader. Link bisa didownload dari sini --> multiupload.com.
Kemudian flash lagi menggunakan Ficeto_JVH_Odin. source--> http://www.darkyrom.com/community/in...friendly.3080/
3. Jika sudah menggunakan Gingerbread pastikan juga firmware dasarnya adalah JVH. Jika belum install dulu Ficeto_JVH_Odin.
4. Non aktifkan Lagfix jika flash melauli CWM.
5. Syarat-syarat yang lain sebelum upgrade manual bisa dilihat disini.


Langkah Flashing Darky V10.1:

1. Download Ficeto_JVH_I9000_Odin dan DarkyROM_v10.1. Setelah download copy Darkys_v10.1_Extreme_Edition.zip ke /sdcard kamu.
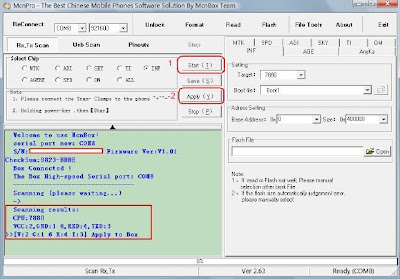
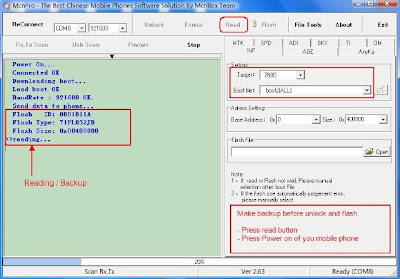
2. Flash Ficeto_JVH_Odin ROM dengan langkah berikut:

* Ekstrak Ficeto_Deodexed_JVH_I9000_ODIN.zip
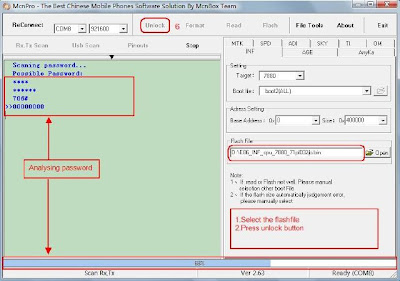
* Buka Odin, masukkan s1_odin_20100512.pit di bagian PIT, dan Ficeto_Deodexed_JVH_I9000.tar di bagian PDA.
* Centang Re-Partition, Auto Reboot dan F. Reset Time.
* Tampilan Odin bisa dilihat dalam gambar di bawah. Klik gambar untuk memperbesar.


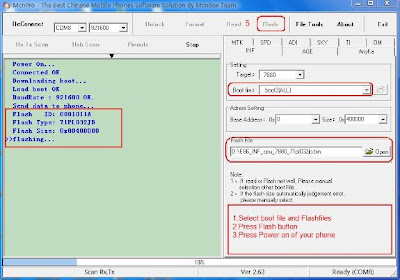
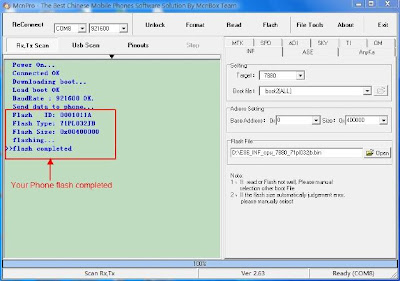
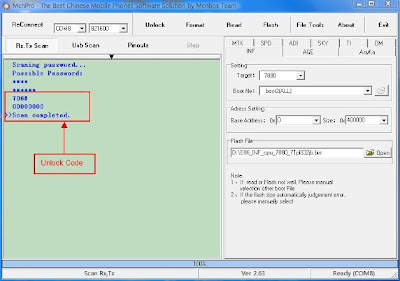
* Klik Start dan tunggu sampai proses selesai. Jika proses selesai akan otomatis reboot. Tampilan Odin yang menandakan proses selesai bisa dilihat di gambar berikut:


3. Disarankan untuk mengecas baterai sampai full.
4. Download Darky Configurator langsung dari HP Kamu. Pilih setingan di Darky Configurator. Pemilihan yang perlu antara lain: Kernel Options (Pilih Recommended: Darkcore 2.4 atau Voodoo), Skip Modem dan yang lain terserah Anda.
5. Matikan HP sampai benar-benar off, kemudian tekan 3 button combo (Volume Up + Home + Power) untuk masuk ke Recovery mode (Recovery = CWM).
6. Flash Darkys_v10.1.zip. Setelah masuk CWM cek lagi apakah Lagfix aktif atau tidak

* Pilih 'install zip from sdcard' (Untuk pilih bisa tekan volume bawah dan atas, tekan Power untuk OK)
* Pilih 'choose zip from sdcard' dan cari Darkys_v10.1_Extreme_Edition.zip
* Pilih 'Yes - Install Darkys_v10.1_Extreme_Edition.zip'
* Tunggu sampai proses selesai. Setelah selesai tekan 'Go Back' dan 'reboot system now'
* HP akan reboot dan proses flashing masih berjalan (nanti akan terdengar suara robot cewe'). Proses agak lama bisa sampai 5 menit.
* Selesai dan selamat menikmati Darky V10.1 Extreme edition.

Semoga bermanfaat
Read More

RIFF JTAG | Repair Boot and Unbrick Samsung i997

Diposting oleh fatih on Senin, 10 Oktober 2011

RIFF JTAG | Repair Boot and Unbrick Samsung i997

Samsung I997 is based on the S5PCxxx Processor (ARM core is Cortex-A8).
Note, one simple way to connect over JTAG – connect USB cable to PC and insert battery. In this case phone is automatically powered on. But note, in very rare cases it is possible that you will have to hold Power On key during initial connection.
In case after resurrection (after you have tried with both boot versions) the download mode is not initiated (LCD remains blank) do repeat resurrection with ‘Clone Gremlin zone’ option checked.


To resurrect Samsung I997:
  •  Solder JTAG cable to Samsung I997 JTAG pads;
  •  Connect microUSB cable to phone and PC;
  •  Insert battery;
  •  Make sure Samsung I997 is selected in the list of models;
  •  Make sure a fixed TCK frequency is selected;
  •  Click Resurrect button;
  •  Wait till software signals a successful operation completion;
  •  Disconnect USB cable, de-solder JTAG wires;
Now phone is in bootable condition, that is, even if it does not start up normally, you can flash it using original Samsung downloader software to restore it to the working state.

To enter download mode:
  •  Disconnect PC cable;
  •  Insert battery;
  •  Hold both ‘Volume Down’ and ‘Home’ keys and press Power-On.
Read More

Cara Flashing Sony Ericsson Xperia Menggunakan Flashtool

Diposting oleh fatih on Sabtu, 08 Oktober 2011

Cara Flashing Xperia Series Menggunakan Flashtool - Biasa nya semua teknisi handphone dalam melakukan flashing / upgrade firmware jenis handphone Sony Ericsson selalu menggunakan Box flasher atau menggunakan tool Sony Ericsson Update Service (SEUS). Dalam kesempatan kali ini saya akan coba mengungkap cara flashing Sony Ericsson Menggunakan tool gratisan yaitu Flashtool. Contoh handphone yang kita flashing dalam tutorial ini adalah jenis Xperia X10

Keuntungan dalam menggunakan tool gratisan ini adalah anda tidak memerlukan box flasher dan lebih lagi tidak menggunakan akses internet dalam flashing / upgrade Firmware Sony Ericsson.

Untuk tidak memperpanjang bahasan mari kita mulai Cara Flashing Sony Ericsson Menggunakan Flashtool.

# Pertama sekali Download Flashtool X10  DISINI


FlashTool now is something like an all in one Tool for your phone.
It can:
- Flash original Images (Android 1.6 & Android 2.1 Images)
- Root your phone (Only if the phone is on a 2.1 android version)
- Install xRecovery, Busybox, custom kernels
- Clean your Rom (remove /system/apps apps of your choice) (Be careful, unless you really know what you do, do not modify the default list. This can make your phone stuck at the SE Logo)
- Clear dalvik cache
- Optimize (install of JIT v2)
- Customize (installs apps found in the custom/apps folder of the flashtool)
- Clean uninstalled (remove any references to system apps removed in the Clean (root needed) step)
- Edit any text file on the device
- Rebrand your device

Warning about 0.3.0.0 version :
Only X10 is fully recognized in this version.
To add other devices to be recognized, look into the devices folder of Flashtool.
Adding a folder for each new device and duplicating X10 folder content, editing property file too will add a new device to the flashtool.


Untuk versi lama ( 0.2.9) dapat didownload disini


Caranya:

  1. Extract Flashtool
  2. Copy firmware ext .tft di folder firmware
    Contoh extract flashtool di desktop

  3. Buka Flash tool

    Dalam kondisi hp off (mati) tekan tombol back sambil dicolok usb, dan lihat lampu hijau menyala (tanda download mode , install driver driver jika belum terinstall sebelumnya)
    Klik Flash , pilih firmware dan tunggu


    Jika pesan terakhir "Flashing finished" berarti telah selesai. 

    Read More

    [TUTORIAL] Flashing Nokia Phone Using Phoenix Service Software

    Diposting oleh fatih on Sabtu, 10 September 2011


    Disclaimer

    1. This article is for Education Purpose only.
    2. This tutorial is NOT for Dummies and Non-professional users.

    3. This tutorial was tested in "Windows XP" &
    "Windows 7". (Better use "Windows XP")
    4. This tutorial is based on "Phoenix 2011". It may be different in other versions. 

    5. I don't being held responsible for any damage causes to your mobile phone. Try it at your own risk.
    6. What you may have done here can VOID your Nokia warranty.
     
    If you OK with above disclaimer, let the FLASH begin!


    FAQ
    Q : Why upgrade to the latest firmware needed ?
    A : Because the latest firmware can solve a lot of bugs such as slow messaging, slow opening gallery, RAM issue, etc.

    Q : I have Nokia phone that still in warranty why must i follow your tutorial while i can upgrade in Nokia Center ?
    A : You're right. You don't need this one. Please go to "Nokia Center" to upgrade your firmware free of charge.

    Q : Why offline? You can use online update with Nokia Software Updater (NSU).
    A : That's because someone may had a bad Internet connection.
    If downloads from rapidshare failed, you can just re-download again and again,
    BUT if download (online update) through NSU failed then your phone is DEAD.

    Q : I have N70 or N73 or another N-series. I want to upgrade to Music Edition or Internet Edition with the latest firmware. Is that possible ?
    A : Yes. This is what i have done. Just follow this article.

    Q : My phone is not listed. Do i need to upgrade ?
    A : You're using old-fashion mobile phone (no offense, lol). Then you can read the rest of this article but you won't need upgrade your phone.

    Q : If flashing failed and my phone dead what should I do ?
    A : Then you should read more careful my article. No I'm kidding, Don't worry about that. You can flash dead phones too.

    Q.
    Flashing failed, I can not do anything, "Dead Phone flashing" not work, what now?
    A. Bring your phone to nearest "Nokia Service Store"  :(


    Tools and Requirements :
    1. PC with Win XP or 7  installed. (I didn't test on Vista yet)
    2. Nokia USB cable. (came with the phone!)
    3. Phoenix 2009 or 2010 or later Versions (available in the end of article)
    4. Offline firmware for your Nokia type. *(Size vary 30 MB - 300 MB)
     
    - Check your current firmware by pressing *#0000# in your mobile phone. Write down somewhere.
    - Visit HERE to download latest firmware for your phone.
    - Choose your Nokia type or Search the Site.
    - Choose your latest firmware with region on your country and download.
     
    APAC = stand for Asia and Pacific
    EMEA = stand for Europe, Middle East and Africa
    EUROstand for Europe
    MEA =
    stand for Middle East and Africa
    LTA =
    stand for Latin America
    SEAP =
    stand for South East Asia Pacific

    Here is little info about Nokia Firmware Pack APAC, EMEA, EURO, LTA. By this info you can identify which firmware pack you have to download according to your own state.
     

    APAC and Asia-Pacific

    - Asia-Pacific Regional:

    Australia, Bangladesh, China, Hong Kong, India, Indonesia, Japan, Korea, Malaysia, New Zealand, Philippines, Singapore, Taiwan, Thailand, Vietnam
     

    EMEA and Europe/Middle-East/Africa
     
    - EUROPE Regional:
    Austria, Belgium, Bulgaria, Croatia, Czech Republic, Denmark, Estonia, Finland, France, Germany, Greece, Hungary, Ireland, Israel, Italy, Latvia, Lithuania, Luxembourg, Netherlands, Norway, Poland, Portugal, Romania, Russia, Serbia, Slovakia, Slovenia, Spain, Sweden, Switzerland, Turkey, Ukraine, UK
     

    - Middle-East Regional:

    Pakistan, Iran, Lebanon, Oman, Afghanistan, Bahrain, Iraq, Israel, Kuwait, Lebanon, Palestinian, Territories, Qatar, Kingdom of Saudi Arabia, Syria, UAE, Yemen
     

    - Africa Regional:

    Algeria, Angola, Benin, Botswana, Burkina Faso, Burundi, Cameroon, Cape Verde, Central African Republic, Chad, Comoros, Congo, Dem. Republic of Congo, Djibouti
    Equatorial Guinea, Eritrea, Ethiopia, Ivory Coast, Egypt, Gabon, Gambia, Ghana, Guinea Republic, Guinea-Bissau, Kenya, Lesotho, Liberia, Libya, Madagascar, Malawi, Mali, Mauritania, Mauritius, Mayotte, Morocco,Mozambique, Namibia, Niger, Nigeria, Reunion, Rwanda, Sao Tome and Principe, Senegal, Seychelles, Sierra Leone, Somalia, South Africa , Sudan, Swaziland, Tanzania, Togo, Tunisia, Uganda, Zambia, Zimbabwe
     

    EURO and Europe/Europa

    - Europe/Europa Regional:
    Austria, Belgium, Bulgaria, Croatia, Czech Republic, Denmark, Estonia, Finland, France, Germany, Greece, Hungary, Ireland, Israel, Italy, Latvia, Lithuania, Luxembourg, Netherlands, Norway, Poland, Portugal, Romania, Russia, Serbia, Slovakia, Slovenia, Spain, Sweden, Switzerland, Turkey, Ukraine, UK
     

    LTA and Latin America
     
    - Latin America Regional:
     
    Argentina, Brazil, Caribbean, Chile, Colombia, Mexico, Venezuela
     

    Preparation
    1. In your PC :
     
    *. Create restore point through Start > All Programs > Accessories > System Tools > System Restore. Name it 'Before flashing' click create.
    *. Remove Nokia PC Suite, Nokia Software Updater, Nokia Care Suite, Nokia Modem Drivers, Nokia Connectivity Drivers through Control Panel > Add/Remove Programs, but DO NOT REMOVE PC Connectivity Solution and Windows - Nokia Modem.

    *. Restart your PC.
    *. Do not connect your phone before installing Phoenix software.
    *. Disable all antivirus, firewall, anti-spyware, anti-malware etc.
    *. Disable screen saver.
    *. Check C:Program filesNokiaPhoenixProducts If you have those folder in there delete all.

    2. In your mobile phone :
     
    *. Backup all your mobile phone content since all your data will be lost after flashing. (If you phone is dead, skip this step!)
    *. If you protect your memory card with password, then remove it.
    *. Remove your memory card from your mobile phone.
    *. Go to Tools > Settings > Security > Phone and SIM.
     
    - Set Pin code request to Off.
    - Set Autolock period to None.
    - Set Lock code to default password which is 12345.
    - Set Lock if SIM changed to No.
     
    *. Uninstall your mobile antivirus. (if you have any)
    *. Charge your phone battery to at least 70% and keep charging. (Although flashing takes only 7-10 minutes.)

    Begin Flashing
     
    1. Install Phoenix Service Software 2001 or later :

     
    *. First Extract the archive you have downloaded which contains Phoenix Service Software 2011 or later Here
    *. Install the software. Be patient, it may take some minutes to install all the components.
    *. Don't run Phoenix software after installation.
    *. Connect your Nokia handset to your PC with USB cable in PC Suite mode.
    *. windows will start installing the connectivity drivers as soon as you connect the phone. Let it install completely.
     
    - If this process failed then you must be remove PC Connectivity Solution. But don't worry we created restore point earlier remember.
    - Restore your system and start remove Nokia component again but do not remove PC Connectivity Solution.


    2. Install Offline Firmware Package You Downloaded :
     
    - If your firmware file is in .RAR format, first extract it using WinRar on desktop.
    - On desktop you will find .EXE file of your firmware file.
    - Install the EXE file. Do not change its path. It will install it to default location of C:Program files/Nokia/Phoenix/Products
     
    - If you have downloaded a firmware file which doesn't have an auto setup, then just copy your Extracted folder Manually in the directory C:Program files/Nokia/Phoenix/Products
    - Be sure you install updated firmware. You cannot downgrade your phone's firmware in BB5 phones which includes all new Nokia phones including N-Series. (N82, N90, ....) (But there is still some tricks!)
    - Phoenix allows downgrading but your phone doesn't allow it as your phone has some special security built into. So no use of trying it. You'll get an error message.

    For Nokia Firmware Download Here

    3. Flashing Procedure (Updating to latest firmware version) :
     
    - Open Phoenix Service Software by double click on the icon from your desktop.
    - Connect your phone in PC Suite Mode.
    - In Phoenix, click File > Manage Connections.
    - Now click New.
     
    - Now select the type of cable you are using. If you are using DKE-2, CA-53 [N-Series] cable, select USB.


    - Click Next. It will find your product and say FOUND. If it doesn't find any, you can try changing your cable type by clicking Back.

    - Click Next and then Finish.

    - Now your cable type (USB) appears in the connection list. Select it. Click APPLY and then CLOSE.

    - Now select File > Open Product.
     
    - A list of RM code will open. Select your phone's RM code. Like RM-133 for Nokia N73 or RM-84 for Nokia N70 and other nokia's with there corresponding Rm Types but choose the one which corresponds to your phone! Click OK. At this steps if you receive an error its okay. Just ignore it.
     
    - Now select File > Scan Product.
    - Your phone's firmware info will appear at the extreme bottom of the Phoenix window.
    - Now go to Flashing > Firmware Update.
    - A window will open.
    - On that window click Browse button (the one with three dots)


    - A window will open with various products and various regions. Choose the region or country of your choice according to the language pack you want to install.
    - Click OK.
    - Click Refurbish.
    - Now your actual flashing has started.


    DO NOT TOUCH! 
    Don't touch your phone or press any button until the flashing has finished.

    Also don't touch your data cable and your computer system.

    Remember don't Touch! (Still touching?)
     
    - At the end Phoenix will tell you to remove your phone as the flashing has finished.
    - Now wait for your phone to reboot into latest firmware.
    - The flashing procedure takes 7-10 minutes


    4. Flashing Dead Phones
    [Which show only white screen on startup] :  
    Note: You can install any firmware in dead phones whether it is latest and or the old one.
    Note (Again): You can make a dead phone if you want! Just unplug your cable while flashing!

    The procedure is almost same as regular flashing.
     
    - Start Phoenix. Connect your phone with USB Cable (phone is off at this time).

    - Click File > Open Product. Select your RM code from the window that appears. Click OK.
    - Click File > Manage Connections. Select No Connection. Then APPLY and CLOSE.
    - Now straight away click Flashing > Firmware Update.


    - A window will open. Click on Browse button. (the one with 3 dots)

    - A window will open with various products and various regions. Choose the region or country of your choice according to the language pack you want to install.
    - Here is different part, check the option "Dead Phone USB Flashing".
    - Click Refurbish.
    - Flashing has started.


    - After some seconds flashing will pause and asking you to turn your phone ON. (Or maybe not, It depends on phone)
    - Press POWER button of your phone until backlight comes up. Remember not to remove your cable or even remove it accidentally will switching on your phone!!
    - Flashing will proceed.
    - Your phone will automatically start when the flashing finishes.

    After finish you can safely remove your data cable from Phone. FINISHED!!!

    5. Extra
    If you want to install another update to your phone after some months, first remove the previous version you installed in "C:Program files/Nokia/Phoenix/Products"
     
    Delete all the contents of Products folder before installing a new firmware.
    Read More

    [GUIDE] Installing Honeycomb on your Flyer

    Diposting oleh fatih on Selasa, 06 September 2011

    As you probably know, a Beta version of the Honeycomb ROM has leaked for the Flyer. Installing the ROM has been somewhat fraught with danger, so i've written up a guide below.


    PLEASE READ THE EXCEPTIONALLY IMPORTANT POINTS BELOW BEFORE YOU START!

    • This process is recommended for experts only!
    • This guide is only tested on a Euro WWE 32GB 3G Flyer - it may work on other configurations, but this is untested (i'd advise reading the topic to see if anyone has experimented with your configuration!)
    • Anything you do from this point forward is at your own risk - my Flyer works and i've resurrected a couple of others, but I take no responsibility if it all goes horribly wrong. You COULD brick your tablet
    • Do NOT under any circumstances run the RUU in it's entirety nor 'fastboot flash rom.zip' - this will make irreversible changes that you don't want!
    • Be careful if you flash any RUUs or do anything that could revert you to S-ON on a broken system - this could leave you stuck

    With that out of the way, here are some things you also need to know...
    • Before attempting this, it is strongly recommended you ensure you have a RUU install that makes your current Gingerbread install version
    • Assuming you use this guide and have the above file, you CAN downgrade to Gingerbread
    • This ROM is COMPLETELY stock - a MCR will follow
    • Please don't repost this guide - link here so the version the reader has is always current

    OK, Are You Ready......? Let's go..!!
    • Ensure you have an RUU that matches the ROM version on your Flyer. I used the 2.00.405.3 WWE ROM which can be found here - DOWNLOAD - MD5: 28a32c0b1262ced44a547e4a9a42d9b0. This is important for rollback purposes and disaster recovery purposes. Ensuring you have the RUU and your device version matches is your responsibility! If you use a different RUU however, post it below for your peers to benefit from.
    • Download the Honeycomb system image for clockworkmod - you'll need this later - DOWNLOAD - MD5: a068750ade064f4fe3913fe9e13d976f
    • Download the Honeycomb radio image - you'll need this later - DOWNLOAD - MD5: d6b36ccb1cbdc0a86f41a8f63b7ae52f
    • Download the Honeycomb boot image - you'll need this later - DOWNLOAD - MD5: 26f53c6a6e686751e300340af7496b8c
    • Download the revolutionary recovery image patched for new hboot compatability - you'll need this later - DOWNLOAD - MD5: 16fe327f70c3036af69c19ec93b87e44
    • Download the updated hboot - you'll need this later - ensure you check the MD5 after download (VERY important) - DOWNLOAD - MD5: 2eb541192be861ecceb2baa254403ade
    • Unlock your Flyer's bootloader with Revolutionary.
    • You should still be in bootloader - if not, use 'adb reboot bootloader' to return to fastboot
    • Flash your device's radio with the Honeycomb radio with the fastboot command 'fastboot flash radio stock-hc-flyer-radio.img'
    • Flash your device's boot image with the Honeycomb boot image with the fastboot command 'fastboot flash boot stock-hc-flyer-boot.img'
    • Launch ClockworkMod recovery - navigate to the 'bootloader' menu then select 'recovery'
    • Push the new hboot to your device (you've checked the MD5 right?) and flash - 'adb push stock-hc-flyer-hboot_1.11.0006.nb0 / && adb shell dd if=/stock-hc-flyer-hboot_1.11.0006.nb0 of=/dev/block/mmcblk0p18'
    • Reboot to the new bootloader - 'adb reboot bootloader'
    • You are now in a state where you must unlock the bootloader using the HTC tools - visit http://www.htcdev.com/bootloader/ and follow the instructions (Flyer compatability isn't listed, but it'll work)
    • Flash your device's recovery with the patched-to-work-with-new-hboot revolutionary recovery - 'fastboot flash recovery revolutionary-cwm-4.0.1.4-flyer.newhboot.img'
    • Launch ClockworkMod recovery - navigate to the 'bootloader' menu then select 'recovery'
    • Flash the Honeycomb system zip by copying / pushing to sdcard (adb shell mount /sdcard && adb push stock-hc-flyer-system.zip /sdcard/) then using the on screen menus
    • Erase data / cache using the on screen menus
    • Reboot the device and you should be done!
    Read More

    Root, Flash & Customize Sony Ericsson Xperia X10 Android With Flashtool

    Diposting oleh fatih on Minggu, 28 Agustus 2011


    Flashtool is an all-in-one tool for the Sony Ericcson Xperia X10 that lets you perform a range of advanced operations on your phone including flashing Android images, rooting, installing xRecovery, customizing a ROM and a lot more. Read on for a complete feature list and download details.

    Flashtool deserves to be called the Swiss Army knife for the Xperia X10. Developed and released recently by XDA-Developers forum members Bin4ry and Androxyde, the latest 0.2.5 version allows you to perform pretty much any advanced operation you want on your phone. Here is a list of all it can do:
    • Root your Xperia X10 running Android 2.1 Éclair.

    • Flash an original Android 1.6 Donut or Android 2.1 Éclair image

    • Install xRecovery,

    • Install Busybox,

    • Modify a ROM to exclude system apps before flashing,

    • Clean all references to the removed system apps from the ROM,

    • Customize the ROM with additional apps,

    • Optimize with JIT v2 compiler and

    • Edit the /system/build.prop file.

    While Flashtool itself may not allow you to install custom ROMs as it only supports the official Android images, it does let you install xRecovery that you can use to install custom ROMs to your phone.
    Using Flashtool is pretty straight-forward and the options are laid out very conveniently in the GUI buttons and menus. Just be careful to use the correct images and apps with it, and you should have no problems.
    Flashtool works on Windows XP/Vista/7 and can be downloaded for free from the link given below.


    Download Flashtool v0.2.5 for Sony Ericsson Xperia X10
    Read More

    Commzerro MTK Box Sukses Format Via GPGDragon Box

    Diposting oleh fatih on Jumat, 26 Agustus 2011

    Para pengguna GPGDragon Box sekarang dapat menggunakan nikmatnya MTK Box karena hanya dengan memakai GPGDragon Box kita dapat menjalankan software Commzero miliknya MTK Box


    Penasaran.......??? silahkan simak tutorial nya


    1. Silahkan di upgrade Firmware Box GPGDragon ke versi 1.56 keatas


    2. Gunakan Software MTK Box Commzero Versi 3.920 dan buka applikasinya. Untuk yang belum download silahkan Download DISINI


    3. Pilih Port USB yang sesuai kemudian klik Star


    4. Apabila GPGDragon Box telah terverifikasi oleh software Commzero menandakan GPGDragon Box sudah siap untuk digunakan


    Sebagai sample disini saya coba melakukan perbaikan software handphone Nexian G501 kondisi restart (kebetulan hanya ada hp ini, hehehe)


    Proses Read Info


    Proses Read Flash (untuk backup firmware buat persiapan aja)


    Proses Format berjalan sukses 


    Sampai disini hp nya sudah menyala normal hanya imei sedikit cantik dilanjut dengan Write Imei
    Proses Write Imei juga sukses


    Terakhir jadi nota deh,.... hehehehe


    Thanks to GPGDragon team and MTK Box Team
    Read More

    Tutorial Repair Boot Problem Samsung 5620

    Diposting oleh fatih on Kamis, 25 Agustus 2011

    First you need uart cable!
    This is the schematic that works whit ufs hw


    see the selected zone!


    After boot repair you must disconect uart cable, insert battery, make download mode for phone, pressing vol down - key and power on same time, connect usb cable and flash the phone whit boot. On boot select boot folder from flash pack and select bcmboot. The program will flash all file from this folder.


    After flashing ok the phone will restart and make some preparation. Do not take off the battery only after the phone will start.


    Read More